


First off, let me clarify that it's us (Kris and I) who are the 'dummies' here. Although this isn't the first time we've tried durian, it's the first whole durian that we've ever brought home (which is nothing short of a miracle given that a few years ago Kris wouldn't even let me come near him after I ate durian flavor ice cream). And though I'm no stranger to consuming weird food, I've always been intimidated by the durian's seemingly impenetrable shell. So what made Kris finally welcome this notoriously stinky fruit into our house? His highly competitive nature, of course!

We've been having so much fun coming up with entries for Tangled Noodle and Savor the Thyme's Eating Your Words Challenge that we decided to enter AGAIN. Yeah, I know...obnoxious, right? But you have to understand how big a fan I am of the celebrity guest judge, Andrew Zimmern from Bizarre Foods! I mean he's like my IDOL (hey, did I mention that it's Weird Food Wednesday?!) Plus there are no restrictions (at least not currently) as to how many times we can enter. And like any other competition, Kris really wants to win (remember when we ate a record breaking amount of ice cream for the Ice Cream Social last year because Kris thought it was an all-you-can-eat competition?) Maybe they'll be a prize for the person who submits the most entries (LOL).
I wanted to tailor this submission specificially for Zimmern, so I started brainstorming about what I could make with bizarre foods...
maybe spell C-R-U-N-C-H-Y with crickets? Write A-W-F-U-L with offal? But I didn't necessarily want it to be a gross-out kind of thing. Once again, my brilliant hubby came to the rescue - "Let's do something with durian!" Ah...the durian, otherwise known as the 'King of Fruit'. How apropros...it's the one thing Andrew Zimmern has not been able to stomach (this from the guy who's eaten moose nose jelly and giant beetle larvae with relative ease). An entry showcasing durian, Zimmern's evil archnemesis, is bound to get his attention!
After several rounds of hi-fiving my husband, reality set in. I've never made anything with durian before, let alone even know how to open one! Kris suggested we hit it with an ax and if that doesn't work he'll take out the chainsaw. Luckily my parents, lifelong durian enthusiasts, were only a phone call away. My mom was pretty excited at the prospect of her only daughter buying her very first durian (awww...) but said to call back after we'd purchased a frozen one. "Frozen?! How many days does it take to thaw?" "Only a couple," replied my mom," but make sure you put it by the heater." Hmmm... this posed yet another problem - the thought of keeping a smelly durian inside the house while it thaws is Kris' worst nightmare. Luckily the spirit of competition prevailed and we set out to get a frozen durian from the local Asian food market.
When we got to the market, I didn't know the first thing about picking a durian so I chose a medium size specimen that had a tiny little crack in it. I figure that the split would be a good starting point for opening it.
Here's our 6 lb baby, thawing out in our sunroom (oh man, will my sunroom forever smell like durian?):
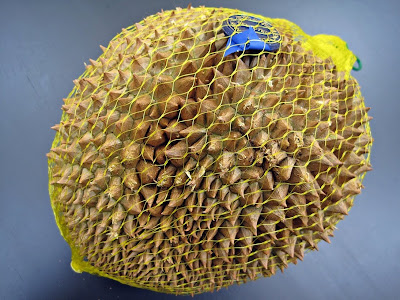
There are several varieties of durian but according to my dad, most of the ones you'll find in North America have been imported from Thailand, and have been bred to produce a smaller seed-to-flesh ratio. This durian is the Morn Thong (a.k.a. golden pillow or butter almond) variety from Thailand:

When I called my parents to give them a progress report, my dad immediately asked about the shape of the durian. He says that when selecting a durian, he ignores the symmetrical-looking specimens and always picks one that is bulging out on one side (a sign that there's a large pod of durian meat inside). My durian was clearly protruding out in one area - woohoo! My dad said that section will undoubtedly contain the largest pod with the sweetest meat (he was right). He also asked whether the durian still looked 'fresh' - was there still a slight tinge of green on the shell? Were the spikes and stem intact and in good condition? Yes and yes (although you'll notice some busted spikes in my photo but those injuries were sustained while rolling around in our trunk during the drive home). Then my mom got on the phone to ask whether the skin had "any visible cracks in it?" Yes again! (I guess this means I'm a 'natural' at selecting durian). My mom says you should always look for one with a small crack because it means the durian ripened successfully before it was frozen, but never pick one that has splits all over because it means it's probably past its prime.

Over the next couple days, the skin between the spikes became more supple and the odor intensified. This is a good sign according to my father - a durian that doesn't stink is most certainly a dud. To me, the ripening durian smelled wonderfully sweet and tropical, reminding me of Malaysia. To Kris, it smelled like rotting fruit but at least he wasn't disgusted about it (yet).
By the second day, hairline cracks were beginning to appear in the shell, so I gently helped them along by applying gentle pressure with my fingernail from the stem to the base. See how the cracks have formed a star-like pattern on the base?

And I couldn't resist prying open one of the cracks and deeply inhaling the fragrance within (Kris referred to it as the 'evil within', saying it looked like some kind of alien creature inside):

OPENING TIME!!
Kris in his durian protective wear:

Gently pulling the sections apart with his bare hands:


The durian flesh easily fell out of the pods, but Kris used a spoon because he didn't want to touch the 'alien babies' with his bare hands:


Here's that sweet luscious piece my dad was talking about:

The seed separates easily from the soft creamy pulp:

As I was rolling up my sleeves to dig in, Kris quickly disappeared to another part of the house to hide out. The odor had reached an unbearable level for him so he was steering clear of the kitchen until I was done with my experimentation.
After polishing off that choice piece of durian (buttery, creamy, uber-sweet...how could anyone not enjoy something known as the 'butter almond'?), I set a few fleshy segments aside for my contest entry, but the remainder went into a plastic storage container, which I then sealed inside 2 heavy-duty freezer bags before placing it inside another storage container. For some additional insurance, I surrounded the container with several boxes of baking soda before placing it inside my basement mini-fridge.

To dispose of the durian shell, I wrapped it up in newspaper, tied it up in several layers of plastic grocery bags and put it outside in a tightly covered garbage can. Odor contained!
My next challenge was to make something palatable enough to convince Mr. Zimmern to give durian another try. In Vancouver last year, I tried a delicious durian sticky rice from Phnom Penh (a local Cambodian restaurant and popular foodie destination). Sticky rice was mixed with tiny pieces of durian, topped with quivering spoonfuls of luscious durian pudding and then smothered in rich coconut milk. Even Kris admited that the taste was "tolerable".

So with that dessert as my inspiration...this is what I came up with...
Black Sticky Rice Pudding with Durian Custard & Durian Cookie Letters:
A dessert for durian haters (and the uninitiated)

Every component of this dessert has some form of durian in it. The rice pudding and the custard contain pureed fresh durian. The cookies have been flavored with ground durian chips and durian extract. Coconut milk and pandan essence are perfect complements, calming the intense flavor of durian. And the unmilled black glutinous rice provides a chewy and colorful contrast to the golden pillowy custard, while the cookies add a nice crunch. You can find all of the specialty ingredients (including the durian) at your local Asian food market. I hope you'll try it :)
Durian Custard

Ingredients:
3/4 cup evaporated milk
1/2 cup sweetened condensed milk
3/4 cup canned coconut milk (stir can to mix the heavier cream with the thinner liquid underneath)
3/4 cup fresh durian pulp
1 egg
3 egg yolks
2 1/2 Tbsps superfine sugar
Directions:
Preheat oven to 350 degrees F. Boil water for the bain-marie/water bath.
Puree durian pulp with coconut milk in a food processor. Set aside, reserving 1/4 cup of the resulting puree for the black sticky rice pudding.
Beat egg yolks and egg. Add in evaporated milk, sweetened condensed milk, sugar, and durian puree. Whisk till blended. Strain custard mixture by pouring through a fine-mesh sieve into another bowl.
Set up water bath - I placed a 1 quart-sized oval Corningware dish inside a rectangular 9 x 13 glass casserole. Pour custard into the inner baking dish. Cover custard tightly with aluminum foil. Carefully pour hot water into the outer casserole until it reaches halfway up the inner baking dish.
Bake at 350 degrees F for 45- 50 minutes until the middle is set (will still wiggle slightly). Let cool.
To serve, use a large serving spoon to carefully scoop up generous slices of custard. Serve over black sticky rice pudding or enjoy on its own!
Black Sticky Rice Pudding

Ingredients:
1 cup black glutinous rice*
1 3/4 cups water, plus water for soaking rice
1 cup light coconut milk
1/4 cup white sugar
1/4 cup dark brown sugar
1 tsp pandan extract
pinch of salt
1/4 cup of reserved durian/coconut milk puree (from custard recipe above)
Directions:
Pick through rice to remove any tiny pebbles. Wash rice a couple times to remove grit and loose husks. Soak rice for 8 hours (helps to plump it up).
Drain rice and add to a saucepan with 1 3/4 cups of water. Bring to a boil. Reduce to simmer and cover. Cook for 35-45 minutes until water is absorbed and rice is cooked through (will retain a chewy texture). Alternatively you can use a rice cooker with the same proportion of rice to water.
In another saucepan, combine light coconut milk, white sugar, brown sugar, pandan extract, salt and durian/coconut milk puree. Bring to a boil and reduce heat immediately. Stir in cooked sticky rice. Simmer at low heat, stirring frequently until most of the liquid has been absorbed. The sticky rice pudding can be served warm or cold.
*Note: make sure you use black glutinous rice and not 'forbidden rice' or black Chinese rice (neither are glutinous)
Durian Letter Cookies

I was initially planning on making durian icing to write my letters. But Kris came across a bag of durian chips at the Asian food market and suggested I grind them up and make cookies out of them.

Imagine our surprise when we tasted them - no smell or durian flavor whatsoever and they weren't even sweet!

The bag listed only 3 ingredients - durian (97.5%), salt and vegetable oil, so despite the lack of pungency, these chips were legit. Don't get me wrong, the durian chips were quite delicious, even addictive, reminding us of taro or cassava chips. But to make up for the lack of flavor, I threw in some durian extract. And yes, I cheated a bit with packaged cookie dough - I just didn't see the point in making an entire batch of dough and wasting a ton of flour and butter to make a few letters.
Ingredients:
5 oz of refrigerated sugar cookie dough (about 1/3rd of a package)
1 oz (a large handful) of durian chips
1/2 tsp of durian extract
1 -2 Tbsp water
Directions:
Preheat oven to 350 degrees F. Line a cookie sheet with parchment paper.
Process durian chips in a food processor till finely ground.
Knead the ground durian chips into the sugar cookie dough until well incorporated. Add in durian extract and knead some more till evenly distributed. The dough should be getting soft at this point. Transfer dough to a small bowl and add in 1-2 tablespoons of water, continuing to knead until it becomes soft enough for piping.
Place dough into a quart sized storage bag (use a good quality freezer bag so the sides don't burst when piping). Snip a tiny hole in the corner (no icing tip needed, just a steady hand) and pipe thin letters on to the parchment lined cookie sheet. Bake at 350 degrees F for 3-4 minutes until done (watch them carefully, they go from being uncooked to being burnt very quickly).
Use letters to decorate your sticky rice. Alternatively, you could bake these up as tuiles (thin crisp cookies) and tuck them into your dessert.

So after all of this, has Kris finally become a durian convert?
Sadly, no.
He claims that he's too emotionally scarred from his first few encounters to ever enjoy it. The smell alone psychs him out and he can't seem to get past it.
However, I still consider this a personal victory because Kris was able to eat a few spoonfuls of the dessert without retching. He says this dessert is a good place to start for beginners ("start with the cookie..then try the sticky rice, and finally the custard"). And the next thing you know, you'll graduate to eating the real fruit. So Mr. Zimmern, won't you give durian another try?
And just in case anyone was wondering, 5 baking soda boxes were no match for the formidable durian. Over a 24 hour period, the smell inevitably crept out, layer by layer, until it had completely commandeered my poor little mini-fridge!
4/08/10 Update: Well, we didn't win (no regrets, I'm still glad we opened our first durian), but our other entry, Spelling with Sushi, got an honorable mention! Be sure to check out Part I and Part II of the challenge roundup, as well as the winning entry here.


 You have until March 31st to enter and the prize for this year's challenge is an


 ps. This is my submission to


